With a longstanding reputation as a leader in the field of extra-oral 3d scanners, 3shape has continued to improve on their designs with each passing generation of scanners that they’ve introduced.
Keeping in mind what technicians really want with each new iteration, they’ve managed to transform what we once considered pretty innovative-into relatively standard features that are simply expected of every 3d scanner released to the dental market today.
To separate themselves from the equally-as-capable competition, 3shape has taken a gamble with some new feature additions that have some real potential game-changing power. This is the review of the 3shape D2000 scanner.
Visual and Build Quality
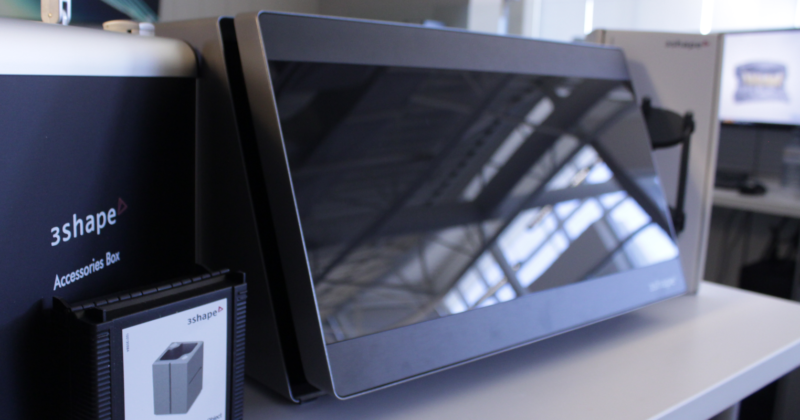
The most apparent feature of the D2000 is the extra large scanning area. In fact, there’s nothing more accurate to say about the D2000 than it is a big scanner. It’s wider, more spacious, and heavier than most of the 3shape scanners that have come before it. The exception being the D250.
The D2000 comes in a space grey color scheme reminiscent of Apple’s iPhones, and features 4 individual 5 megapixel cameras. There are 27 LED lights featuring what 3shape has dubbed their “Blue LED multiline technology”. Pretty much everything you can think of has been upgraded from previous generations and the numbers cranked up to the maximum.
Moving up from an older model like the D810 takes a moment to get used to, but it really is worth it. There’s no question this is a 3shape product. It’s really well made, sturdy and high end, even the door closing and opening feels better than it ever has. The status light is integrated into the logo on the door now, which is a really clever design choice. In fact, the D2000 is a Red Dot design winner.
Scanning Software and Features
On the software side, the improved texture scanning ability fully digitizes models in true living color. Scans coming from the D2000 don’t feel like virtual approximations of the actual model they feel more “authentic” and lifelike somehow. My guess is that is has something to do with the decreased tolerances from 10 microns down to 5 microns; an absolute must for accurate implant bars and long span bridges.
All of the core features of scanning have been refined and honed to perfection; Accuracy, details, speed –Everything works straight out of the box without any real need for tweaks. As one of the first companies to really get 3d scanning right, 3shape has really built a reputation for themselves to live up to as a leader in the field. 3shape has delivered on that promise with the core functionality of this scanner. The new ScanSuite offers a versatile and flexible scanning platform to digitize your models. You can seamlessly switch between each step. This gives you the freedom to achieve whatever results you desire, in whatever order you can conceive. It makes so much sense and I couldn’t imagine going back to scanning in the old linear fashion.
The inside of the scanner is all about the new double scanning platforms and roomy interior. This is very clearly at the epicenter of what 3shape had in mind when they designed and built this scanner. You really get a sense of how they’ve focused everything else around in this one particular feature. Almost every feature and enhancement is directly related to utilizing the platforms to their fullest extent. The execution of that however, sometimes falls a bit short of expectations.
In some situations having a larger scan area makes a HUGE difference. Gone are the days of snapping off articulators and in its place 3shape has introduced some new toys: The occlusion setup tool and the occlusion transfer calibration object. After trying them out I can’t say that I’m completely sold on the ideas. Not being sold seems to be the prevailing theme with a lot of the additional features introduced by the D2000. Texture scanning and rotation-less scanning are a bit slow and cumbersome. Speed mode doesn’t do anything as far as I can tell. The models and designer seem to screech to a halt and defining the individual dies proved to be more of a chore than simply rotating the dies. It’s also very loud, which doesn’t affect any functionality, but it does diminish the element of refinement that 3shape has painstakingly put so much effort into for the visual aspect of the scanner. The refinement of the scansuite is also undermined with little bugs and quirks that don’t cripple the software, but they do put a damper on the overall experience
Furthermore, some long standing features have been removed: The option to load an old scan has been take away — although it’s not necessarily a major loss – simply because of how fast the scanner is. The rotating multi-die arm has been removed, and in it’s place a new stationary multi die plate has been introduced. I’ll be honest, I don’t really miss having to re-calibrate the old arm and plate that much. This new addition is quite welcome.
Conclusion
Overall, although the features or “gimmicks” are nice to have, the truth is that I could live without them. On a day-to-day production basis I normally DO live without them. The concepts introduced are nice, and I’d really like to see 3shape expand and refine these features in the future iterations. There’s plenty of potential here, they just weren’t fully realized with this release.
Final Verdict
With it’s new and improved double scanning platforms The D2000 is fast, accurate, and an extremely powerful scanner. 3shape has really built on and improved those core mechanics that they’re so well known for. However, some of the extra “features” introduced with this scanner seem to fall a bit short of expectations.
Thanks for reading. If you enjoyed this review, please like, share, and subscribe. For everything else 3shape, and all the latest and greatest in dental technology… stick with dentaltechtips!
Nowadays, ceramists are spoiled. It wasn’t that long ago that getting the colours and surface textures you desired would mean an entire career of experimentation. Due to recent developments in stains and glazes, we have practically every colour imaginable available to us at our fingertips.
I received the Ivocolor Starter Kit a couple of months back and I’ve been using almost nothing else since. I wanted to make sure that I had a really firm grasp of the specific nuances and characteristics of the system before issuing my final verdict. The goal was to give an honest review for someone hoping to take the plunge and commit to this system. In full disclosure, I did receive this kit at no cost from Ivoclar, however, there was no financial incentive and it does not affect my final verdict on the product.
First Impressions
Using the stains for the first time, I didn’t really have an idea of what to expect. So I approached it with the idea that I’d explore and test it’s apparent similarities to other stains. One of the best ways to get to know something new is to compare it and relate it to what you are already familiar with.
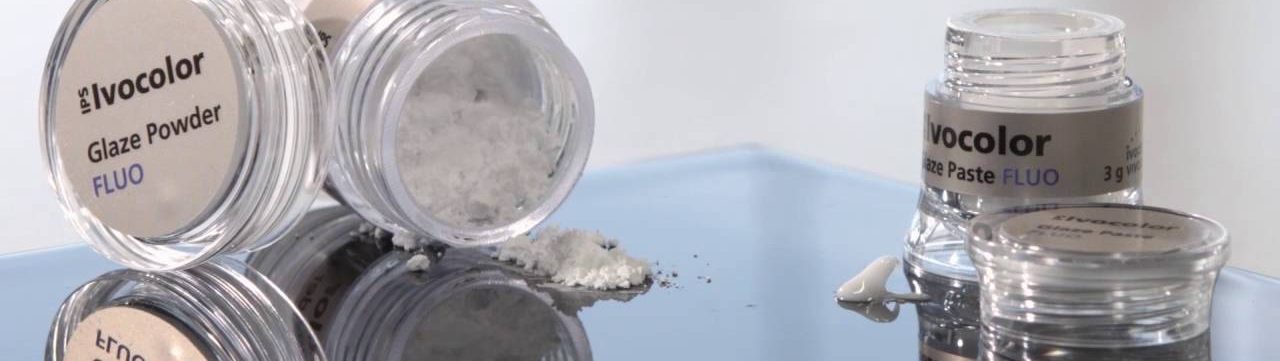
Straight out of the box, you can tell that the development team really put a lot of time and effort into the product. The packaging simply screams quality. With an ultra clear glass-like finish, the jars convey a level of translucency and clarity alluding to the quality of the final product. It has no bearing on the actual product itself, but the thoughtfulness and time investment found here is a nice touch for those who are real sticklers for packaging like myself.
Portion sizes are a bit on the small side. I’m not sure if there are larger sizes available, but it would be great to have; Especially for those popular shades that you tend to use over and over again. Head over to our Youtube Channel and check out the unboxing video if you want to see what’s included in the starter kit.
Overview
Ivocolor is a well thought out and thoroughly tested system. The stains are made from alkali-aluminosilicate glass, a material that is (interestingly enough) found in iphone panels. Aluminosilicate glasses are lauded for their inherent toughness, scratch resistance and compressive strength. I’ve been told that the product has been in development since 2012.
Carrying on the theme from the packaging, the product really feels like “Ivoclar 2.0”: refined, meticulous and calculated. I feel that they’ve developed a truly universal system; Not just a system that “works on all ceramics and fires at the same temperature etc.,” as they’ve claimed in the marketing brochure, but a universal system for both hardcore artists and high volume production labs alike.
Once I started using the system a bit more regularly, I started to understand and appreciate the depth and capabilities of the Ivocolor system. The system is a kind of hodgepodge of the best of both worlds of stains. At it’s core, Ivocolor consists of some pre-mixed gel paste stains as well as powder-based essence stains.
Pre-Mixed Shade Pastes
Gel pastes are great for those looking for consistency, speed and ease of use. The Gels come in 9 dentin shades and 3 incisal shades. If you’ve used empress or crystall glaze pastes, you’ll feel right at home. The working consistency is neither too runny or tacky. Ivoclar has really found and nailed the “goldilocks” texture for working with the gel pastes.
Maintaining colour depth, intensity as well as the great working consistency is truly a treat when working with these pastes.
As wonderful as the gel pastes are, the true star of the Ivocolor system is the powder-based component. The gels are what I like to refer to as a “gateway” into unlocking the true potential of the system: The Essence Powders.
Essence Powder Stains
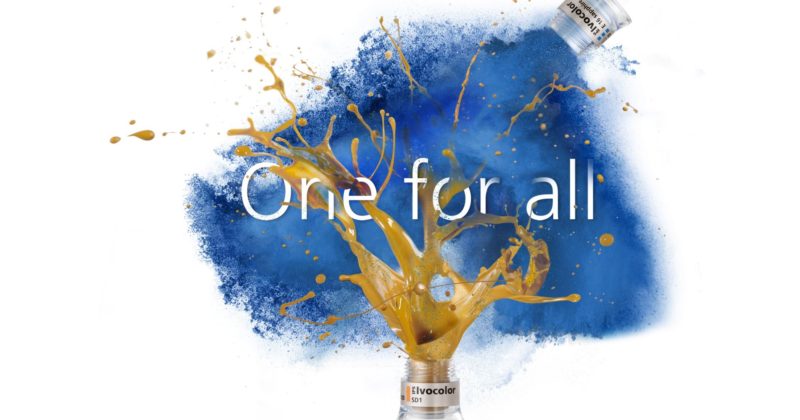
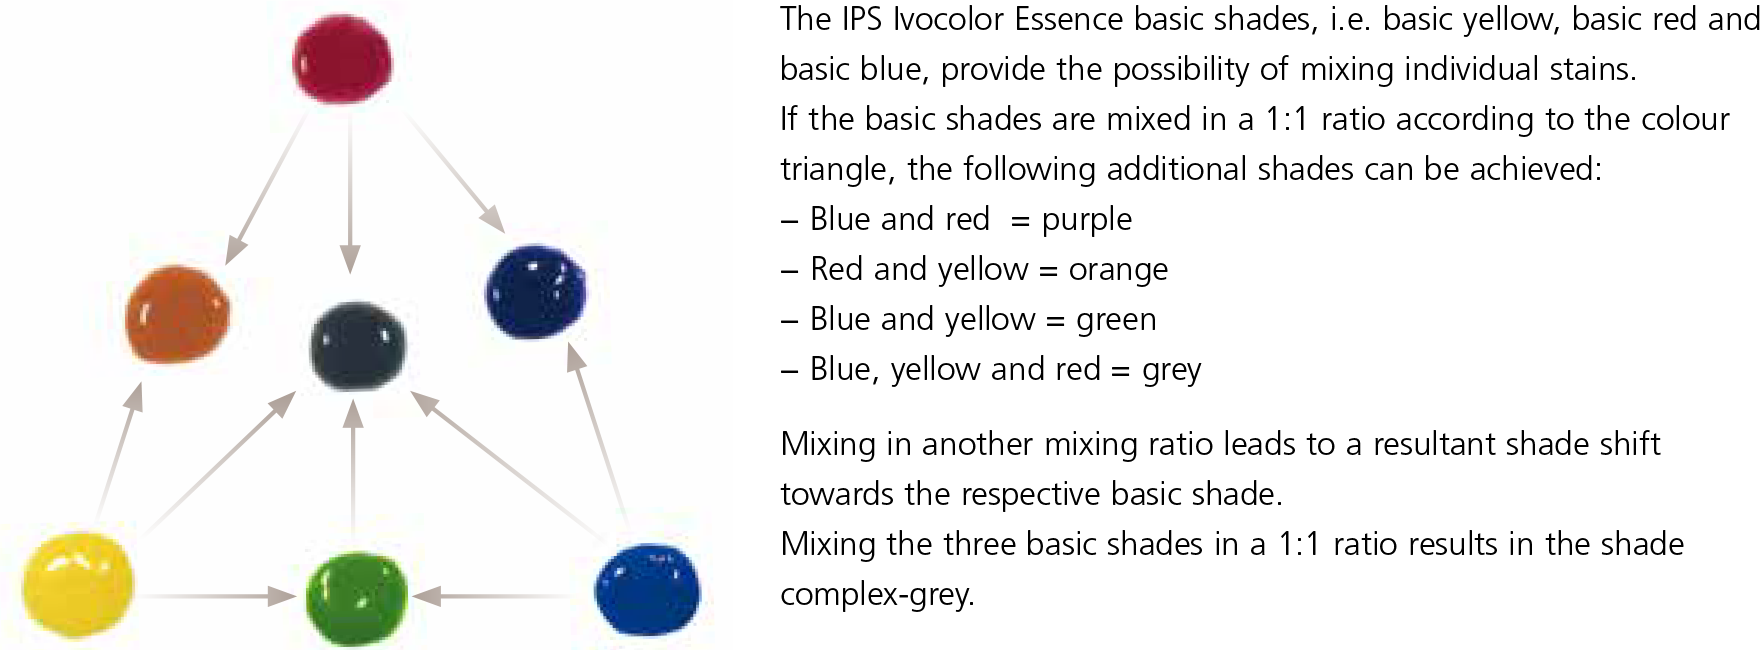
To get my feet wet with the essence powders, I found myself adding small amounts here and there to experiment. The more I used them, the more I liked them. Only small amounts are needed for impressive results. The motto of “One for all” may refer to the universal nature of the system, but the meaning extends to what I refer to as the “trifecta” or “three musketeers” of Basic Red, Basic Yellow, and Basic Blue. With these three colours alone, you have every single colour of the rainbow available to you at your brush tip. This was definitely my favourite part of the entire system.
Essence stains can be mixed with porcelain during buildup, internal characterizations for mamelons, and to create the simulation of cracks. The powder can be added to a second build up if you have trouble controlling moisture. This versatility really adds a layer of depth and dimension to your finished restoration. The “porcelain-like” nature of the powders will be a real treat for talented ceramists who are eager to get their hands on the system. I always found using a gel paste and painting on the surface as an “ok” solution, but it would lead to a dull/flat or dead look for the final product. The level of comfort afforded by the essence powders is just simply refreshing. Once you have your desired look, throw a layer of enamel or transparent incisal over top and fire it.
Firing Cycles
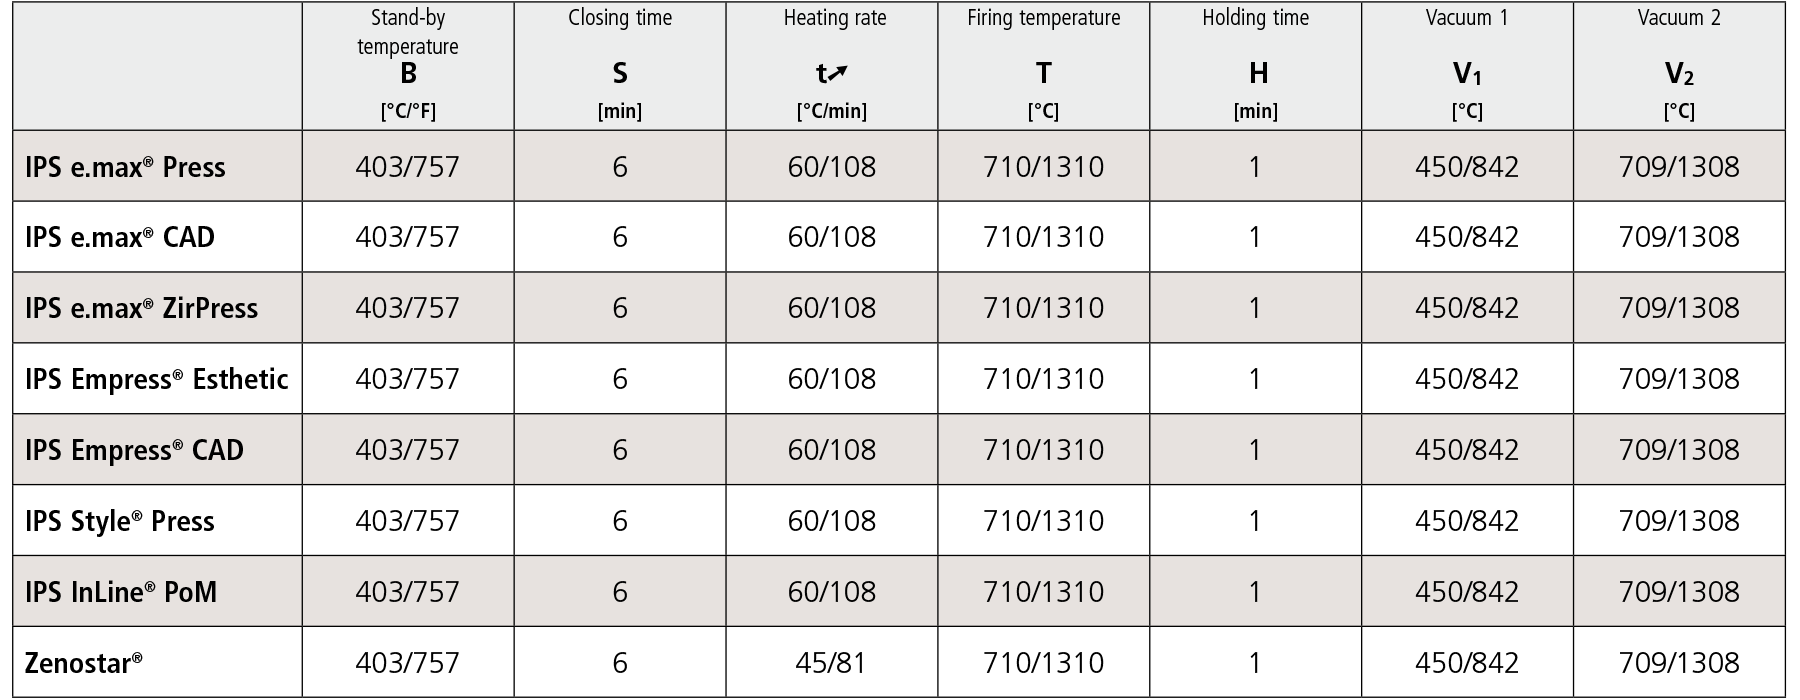
Generally speaking, there’s one firing cycle:
With the exception of Zirconia crowns, every ceramic fires at 710°C/1310°F. This is great for those busy days when you have crowns just sitting there on a tray waiting next to your furnace to glaze. Now you can just get a bigger tray and throw everything in the furnace at once.
When using older stains from Ivoclar in large batches (10-15+ at a time), I would always have problems with haziness or white discolourations for the final finish. There were workarounds like increasing holding times etc., but it wasn’t perfect and only reduced the effects slightly. With Ivocolor they seem to have solved this issue. I’m not sure if it’s a characteristic of the aluminosilicate glass, or a solvent that they’ve engineered, but large batches and single firings turn out with identical results.
The Not-So-Impressive Stuff
No product released is perfect, but Ivocolor comes pretty close. My grievances with the system simply boil down to a matter of preference rather than actual problems.
When it comes to firing multiple units, I feel this is a truly universal system, however, if you look in their catalogue, Ivoclar states: “IPS Ivocolor has only been tested and approved for IPS ceramics and Zenostar zirconium oxide. If IPS Ivocolor is used for other ceramic materials, the responsibility lies with the user.”
It’s like they wanted to go all the way, but simply fell short of committing fully. Yes Ivoclar, we know you would like everyone to use your porcelains and furnaces exclusively, but the truth is, we pick and choose the best of what works for each of us.
I’ve used the stains and glazes on other “unapproved” ceramics and zirconias and they turned out equally as phenomenal… (if not moreso in some instances). Including a disclaimer won’t stop me from using it on other brands. All it does is weaken their credibility and resolve as a universal system. Since Ivoclar won’t say it, I will. Go ahead and use this on any system or ceramic you want, it will turn out great!
As mentioned earlier, I felt that the package sizes are a bit on the small side. I would love to see a big giant Costco-sized jar for those really popular shades that are used over and over again. The starter kit comes with everything that you need to get going. I would’ve preferred to have had a bit more variety. The combination of basic red, yellow and blue is a total knockout, I was surprised that they only included basic red in the starter kit.
Shade 1 is only for A1 on ceramics, and not applicable to anything for zirconia. Shade 4 is for B1 and B2 on ceramics and no zirconia applications as well. No grey type shade for C+D shades was included either. The incisal gels are blue.. and less blue. I would’ve preferred a grey/violet option here.
If you ask me, my ideal kit would’ve been:
Sunset, Khaki, Basic Red, Basic Blue and Basic Yellow for essence powders
SD0 for those hollywood wannabe patients, SD2 would stay and either SD6 or SD8 for those grey/brown/aged ones would’ve sufficed. As for incisal shades I would’ve wanted Si2 and si3 for a violet and blue option.
I’m not saying that the starter kit is a poor choice by any means. I think the reason Ivoclar included these in the starter kit was to really showcase the boldness intensity and contrast of colour capabilities of the system. I simply would’ve preferred the more subtle options because that’s my style of characterization.
Final Verdict
Overall, I’m impressed and I’m glad that I had a chance to try this system out. I’m excited to see how the popularity of Ivocolor will grow in the coming years. The 2-type all-encompassing system is a real game changer and I foresee it as a benchmark for all others to live up to. With such a well thought out and meticulously crafted system, Ivoclar deserves every ounce of praise for their creation. The Gel Pastes have simply nailed the “goldilocks consistency”, not too runny but not too thick. The Essence Powders are an artist’s dream, offering unlimited potential. It is a truly Universal stain and glaze system, fire all of your ceramics (even unapproved ones) all at once in a single program.